Firmware downgrade is often required when your router malfunctions after a firmware upgrade instead of getting improvement. Luckily, there is a way to get back to a previous version.
If a firmware upgrade on your ASUS router malfunctions, it can make the router unusable. Downgrading to a previous release can be achieved by factory resetting the router and installing a previous firmware release using the install utility from the ASUS support website to get back up and running.

Let’s go over this process step-by-step to understand better.
Table of Contents
Step-1: Prepare Your PC for Direct Connection
This step involves setting up a static IP Address on your PC’s NIC (Network Interface Card) that will connect to the Router with an Ethernet Cable. We do this to have the PC and Router both in the same subnet to be able to communicate with each other. Routers come with a factory default IP address that is coded into the firmware which pretty much stays static, most commonly 192.168.1.1. So here in this step, we’ll assign an IP address to the PC within the same subnet such as 192.168.1.10. Here’s how:
(A): Go to your Windows Control Panel > Network and Internet > Network and Sharing Center and select “Change adapter settings“
Alternate Shortcut Method: Click on the Windows Start button, Select “Run” type “ncpa.cpl” and click OK. This will display the network adapters for you same as step- A.
(B): Right Click on the Ethernet adapter and select “Properties“.
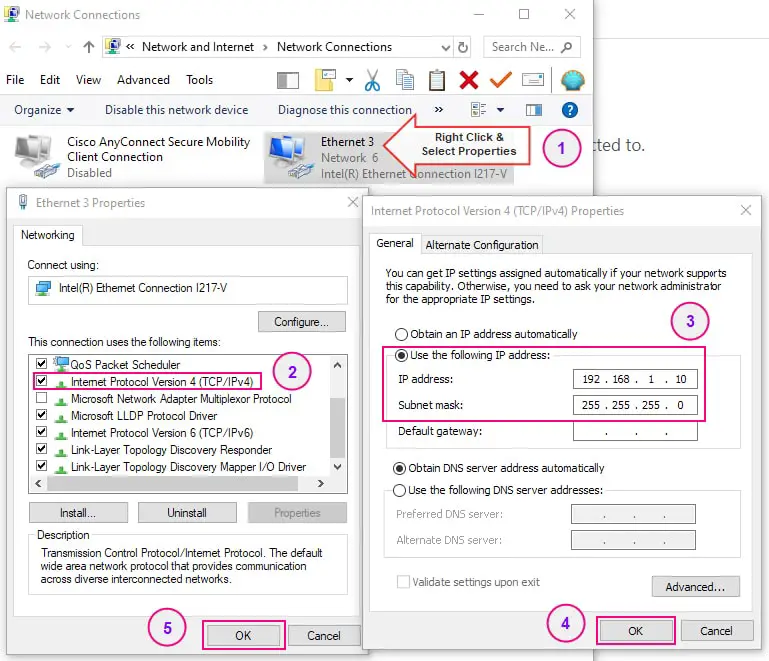
(C): Double click on Internet Protocol Version 4 (TCP/IPv4) and select “Use the following IP address” radio button, which will open up the fields of “IP Address”, Subnet Mask, and Default gateway.
(D): In the IP address field, type 192.168.1.10. In the “Subnet mask” field type 255.255.255.0. Leave the ‘Default gateway” field blank and click “OK” and again on the “OK” button.
Step-2: Download the Firmware and Install Utility
Go to ASUS Download Center and download the following files according to your Operating System (Windows/MAC etc.)
- Download the Utilities file
- Download the Previous stable release Firmware file
Place these two files into a known directory on your PC and get them unzipped for later use.
Step-3: Factory Reset Your Router
This step is necessary as we need to flush the existing configuration. To do so, follow these steps on your ASUS router.
- Make sure the power is ON by confirming the power LED is solid
- Press and hold the Reset button for 10 ~ 15 seconds (till the power LED starts to flash) and let go.
- Wait until the power LED becomes solid again which indicates that the router is booted up and running normally.
Step-4: Connect Your PC to the Router
Connect your PC NIC to a LAN port on your ASUS router with Ethernet(Network) cable. To perform connectivity test, use the following command in Windows Command prompt window:
ping 192.168.1.1
<Press Enter>
You should get 3 good responses back without any loss of packets.
Step-5: Install the Firmware
Launch the Install Utility. Once open, browse and point the downloaded firmware file and start the install process.
Try not to interrupt the installation process by clicking the mouse or pressing any keys on the keyboard. Let the firmware installation process complete, which reboots the router to get it ready for use.
Step-6: Configure Your Network
After a successful install, launch a browser and type 192.168.1.1 in the address bar, and press enter. It will open up a login page for you. You can log in using the default username ‘admin‘ and password ‘admin‘.
Configure your ASUS Router according to your requirements, such as Router Mode, AP Mode, Media Bridge Mode, or Repeater Mode.
You should also update the Admin password and the IP Address of the Router from the “Administration” tab.
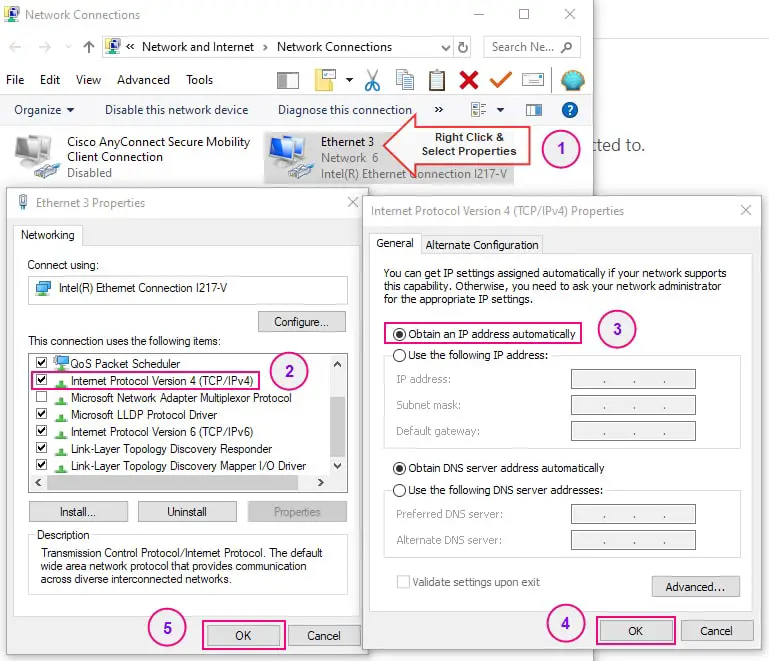
Once you configure the router according to your needs, you may return the NIC settings of your PC back to the automatic IP address, so that it can obtain the IP address from the Router via DHCP and be able to access the Internet. To do this, you can follow the same directions outlined in Step-1, but this time select “Obtain an IP address automatically” as shown in the snapshot below.
Step-7: Backup Your Router Configuration
After you set up your network to desired settings and verify it is working fine, take a quick backup of your router configuration and store it in an external drive to be accessible for later use.
This will help eliminate the configuration part, hence will save you a lot of time if you need the same downgrade in the future.
It also helps in situations where you face degraded performance after tweaking some parameters of your network. With a backup configuration file available, you can quickly restore from it to activate its previous functional state again rather than undoing all the changes you made.
Final Word
Usually, if things do not go as planned with the firmware upgrade, your ASUS router can stop functioning and stay in a stuck state making it unusable. However, downgrading to a previous release is possible by downloading a previous firmware release from the ASUS support website and supporting utility to install the firmware after factory resetting the router. This shall give your ASUS router a new life to be functional again.
I hope you enjoyed this article and found it helpful.