With an increase in remote-work from home and bandwidth-hungry applications including online gaming, having two Internet circuits becomes quite useful to have. ASUS has a great variety of Dual-WAN WiFi routers that offers circuit failure redundancy and load balancing as well.
ASUS router Dual WAN feature keeps your internet service up and running when one circuit fails, as well as Load Balance between them when both circuits are up. Both of these modes are quite useful with customized options available you can set up based on your network requirements.
Now that we know the importance of the Dual-WAN feature, let’s go over in detail how each mode is set up and configured.
Table of Contents
Dual WAN Setup as Primary and Failover Mode
ASUS router offers two options for Dual WAN in Primary and Failover mode setup. One is using a USB connection for your mobile phone connection, and the other is a wired secondary ISP (Internet Service Provider) connection using one of the 4 LAN ports.
Let’s take a look at configuring each of these step-by-step in the next sections.
For setting up these modes, I will be using the ASUS RT-AC68R WiFi router that I own and still love for its packed full of useful features.
Dual WAN Failover Setup as USB Connection Type
Using USB as the secondary WAN connection type allows you to use your Mobile phone Tethering to utilize the cellular network data as your secondary WAN connection, and switch to it when your primary Internet service goes down due to a scheduled or unplanned outage.
Once you configure it, you can simply disconnect your phone while the router keeps all the configurations intact. This way you can simply plug in your cell phone with data ON, to switch to it and get back on the Internet.
Let’s configure it by following the steps below:
Step-1: Log into your ASUS Router, and click on the WAN tab at the left menu towards the bottom
Step-2: In the “Internet Connection” tab, select WAN Type as “USB” and set the “Enable USB Mode” to “ON“
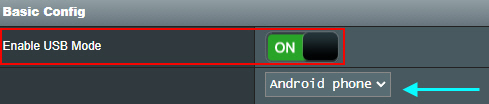
Step-3: Select “Android Phone” in the dropdown box.
Step-4: Connect your Android phone to the ASUS router with a USB cable and Manually enable USB Tethering on your Android phone.
Step-5: Click on the “Apply” button
Step-6: Select the “Dual WAN” tab, and Enable Dual WAN option to “ON“
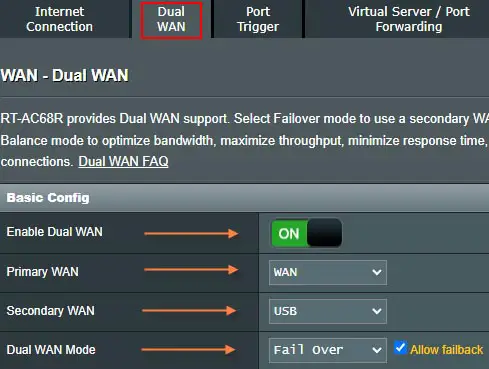
- Set the Primary WAN to “WAN“
- Set the Secondary WAN to “USB” from the dropdown menu
- Set the “Dual WAN” mode to “Fail Over” and check mark “Allow failback“
- Set the “Network Monitoring” method to “Ping” and Type “8.8.8.8” in the dropdown field. You can also select ‘google.com‘ from the menu.
Step-7: Click on the “Apply” button.
You can check the Secondary WAN status by clicking on the “Network Map” tab at the top left menu panel, and then clicking on the “Secondary WAN” icon to display the current status.
Dual WAN Failover Setup as Wired Connection Type
This mode will let you set up a wired secondary Internet connection, such as a secondary ISP (Internet Service Provider) connection. Same options are made available as that of your primary ISP wired connection, which includes “Automatic IP”, “Static IP”, “PPPoE”, “PPTP” and “L2TP” that you can set up based on your circuit type. In this example, we will go with the “Automatic IP” option.
You can use one of the 4 LAN ports for the Secondary WAN wired connection.
Let’s follow these steps to configure it:
Step-1: Log into your ASUS Router, and click on the WAN tab at the left menu towards the bottom
Step-2: In the “Internet Connection” tab, select WAN Type as “WAN” and keep these default values:
- WAN Connection Type: Automatic IP
- Enable WAN: Yes
- Enable NAT: Yes
- Enable UPnP: Yes
- Connect to DNS Server automatically: Yes
Step-3: Click on the “Apply” button.
Step-4: Select the “Dual WAN” tab, and Enable Dual WAN option to “ON” and select:
- Primary WAN: WAN
- Secondary WAN: “Ethernet LAN“, and Select the LAN Port you will be using for the secondary wired WAN.
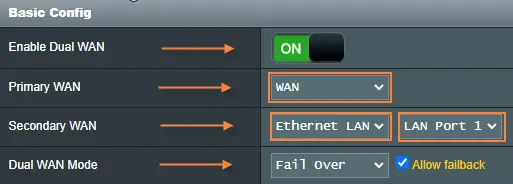
Step-5: Click on the “Apply” button.
Tip: These “Ethernet LAN” ports become available when you select the Secondary WAN to “WAN” option in the “Internet Connection” tab. When USB is selected as a secondary WAN option, then you will only get USB as the second option in the drop-down.
Dual WAN Setup as Load Balancing Mode
Load Balancing is another interesting feature of the Dual WAN setup, where you can load balance your traffic between two active Internet circuits. You can customize it according to your own requirements, as the ASUS router provides a good combination of options available to you.
ASUS router also offers two options for Load Balancing mode. One is via USB connection using your mobile device (data) as secondary WAN, and the other is a secondary wired ISP (Internet Service Provider) connection using one of the 4 LAN ports.
Let’s take a look at configuring each of these step-by-step as follows:
Dual WAN Load Balancing Setup with USB Connection
Step-1: Log into your ASUS Router, and click on the WAN tab at the left menu towards the bottom
Step-2: In the “Internet Connection” tab, select WAN Type as “USB” and set the “Enable USB Mode” to “ON“
Step-3: Select “Android Phone” in the dropdown box.
Step-4: Connect your Android phone to the ASUS router with a USB cable and Manually enable USB Tethering on your Android phone.
Step-5: Click on the “Apply” button
Step-6: Select the “Dual WAN” tab, and Enable Dual WAN option to “ON“
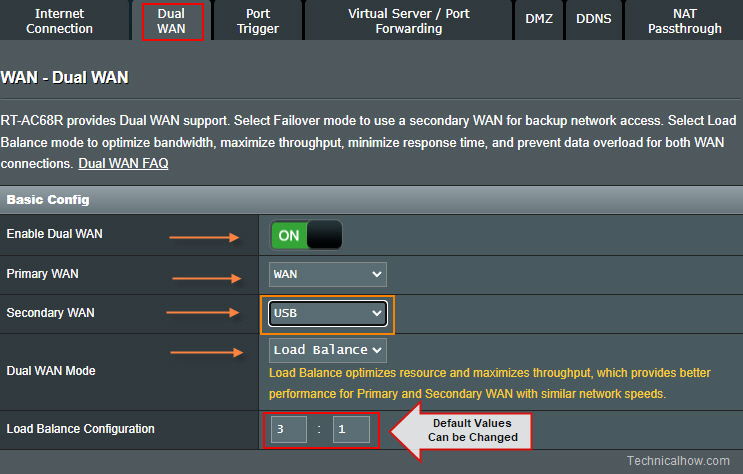
- Set the Primary WAN to “WAN“
- Set the Secondary WAN to “USB” from the dropdown menu
- Set the “Dual WAN Mode” to “Load Balance“
- Set the “Load Balance Configuration” ratio to your needs. Default is 3:1, you can use 1:1 if you’d like to equally distribute the load.
Step-7: Click on the “Apply” button.
Dual WAN Load Balancing Setup with Wired Connection
This mode will let you set up a wired secondary Internet connection, such as a secondary ISP (Internet Service Provider) connection. Same options are made available as that of your primary ISP wired connection, which includes “Automatic IP”, “Static IP”, “PPPoE”, “PPTP” and “L2TP” that you can set up based on your circuit type. In this example, we will go with the “Automatic IP” option.
Step-1: Log into your ASUS Router, and click on the WAN tab at the left menu towards the bottom
Step-2: In the “Internet Connection” tab, select WAN Type as “WAN” and keep these default values:
- WAN Connection Type: Automatic IP
- Enable WAN: Yes
- Enable NAT: Yes
- Enable UPnP: Yes
- Connect to DNS Server automatically: Yes
Step-3: Click on the “Apply” button.
Step-4: Select the “Dual WAN” tab, and Enable Dual WAN option to “ON” and select:
- Primary WAN: “WAN“
- Secondary WAN: “Ethernet LAN“, and Select the LAN Port you will be using for the secondary wired WAN. (I am using LAN Port 1 in this example shown)
- Dual WAN Mode: “Load Balance“
- Load Balance Configuration: 3:1. (Default is 3:1, you can use 1:1 if you’d like to equally distribute the load)

Step-5: Click on the “Apply” button.
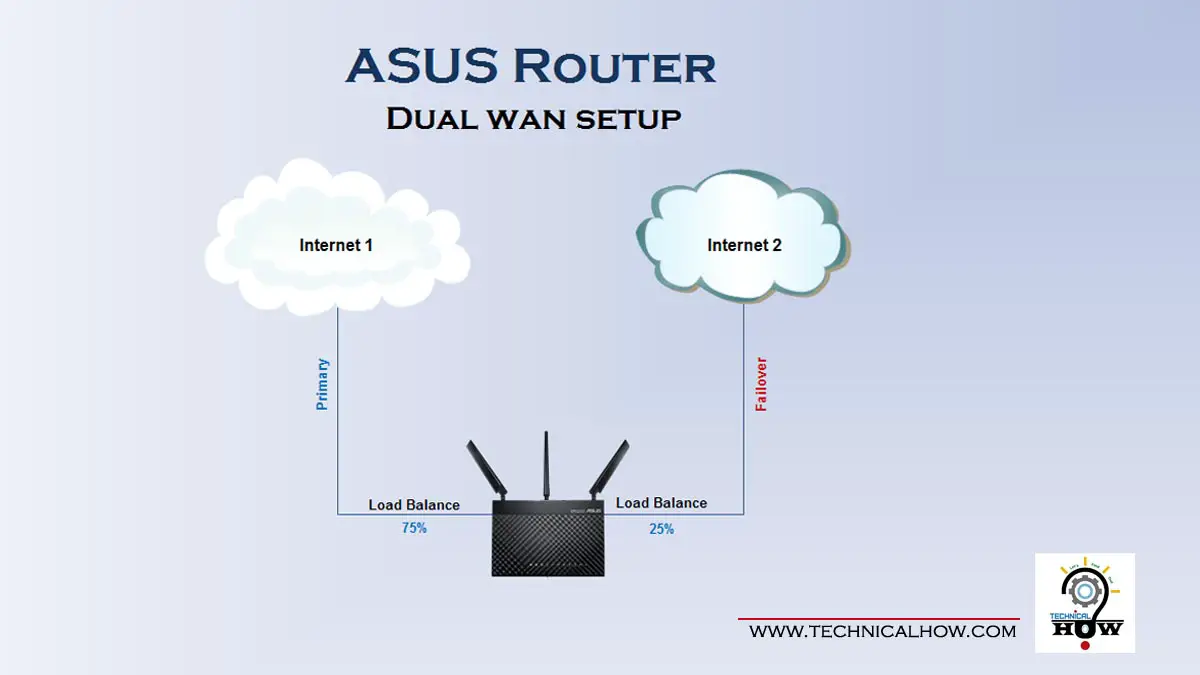
This will enable load balancing between your Primary WAN and Secondary WAN in 75% and 25% load distribution based on a 3:1 ratio. Of course, you can change those according to your requirements.
If you are interested in a more granular configuration of load balancing, keep reading into the next section where I will go over Routing rules and set up a policy based on source and destination.
ASUS Router Routing Rules for Dual WAN
When you’re using ASUS router dual WAN in a Load Balancing mode, you can set up routing rules as a policy to define outbound routes based on source and destination addresses. Let’s take a closer look at configuring it.
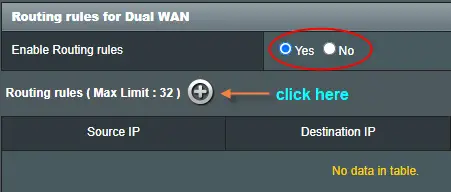
Step-1: On the “Dual WAN” configuration page at the bottom, set “Enable Routing Rules” to “Yes” which enables the Routing Rules section.
Step-2: You can set up your Source IP address, the Destination IP address, and WAN Unit to “Primary” or “Secondary” according to your needs.
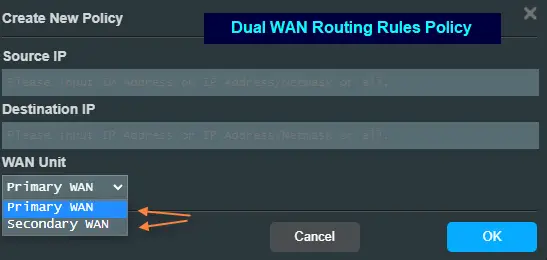
Step-3: Click OK, and then click on the “Apply” button for the configurations to be applied.
Pro Tip: After you get your desired configuration setup and working, don’t forget to take a backup of your router configuration and save it on your PC or an external storage device. This will save you a ton of time when you need to restore your router.
Conclusion
Whether you use your Dual WAN on your ASUS router in Failover or Load Balancing setup, each offers great benefits in terms of redundancy to keep your Internet service functional when one circuit fails.
Such diversity, to be able to use a USB connection with a mobile device to leverage Data package, as well as a dedicated ISP wired circuit is very effective. In addition, the granularity it offers, to set up routing policies takes the available options to the next level.
This means you can set up your critical applications such as gaming and high band consuming applications to route out via a more stable and robust WAN connection, while other ones can be routed over to a lower bandwidth circuit. Such flexibility of setting these up according to your needs, in my opinion, is of tremendous value.
I hope you enjoyed this article and found it helpful.