Today I’ve decided to bring my old Linksys WRT-54G router back to life by making it a wireless repeater bridge to connect two PCs in my Home Office on the second floor without running long wires and drilling through the floors connecting it to the main router in the basement. If you don’t own one, you can get a used one for under $10 bucks as most people do not have use for it. I won’t be surprised if it is given away for free deemed unusable.
An old Linksys WRT-54G router can be of great value when you use it as a wireless repeater bridge. Despite being an older model, a custom firmware like DD-WRT can really empower its hardware to offer up to 5 wired ports for your devices including PC and gaming consoles that need the Internet.
In this article, I will show you step by step how to set up a Linksys WRT-54G router as a wireless repeater bridge using custom DD-WRT firmware. To spice things up, I will be adding it as a second repeater bridge connecting it wirelessly with the ASUS router as my main router to demonstrate a use-case for two repeater bridges of different brand routers working flawlessly in a single network.
Let’s get started and make it all work.
Table of Contents
Check Your Router’s Compatibility for DD-WRT Firmware
First things first, you will need to check your Linksys router’s compatibility with DD-WRT firmware. To do that, you will need to get on a PC with Internet access and visit DD_WRT Router Database.
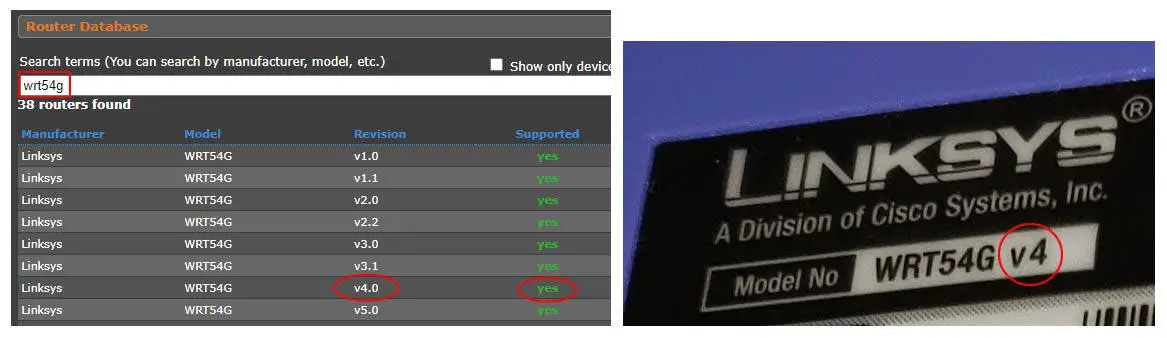
Type your router’s model “wrt54g“, and check if the version/revision is there and shows “Yes” under the Supported tab.
Tip: If you are hunting to get one, verify the revision number to make sure it is DD-WRT supported.
Download Custom Firmware
Here you have several options as there are quite a few builds made available to use. For simplicity, I will go for the Standard version “dd-wrt.v24+std_generic.bin”
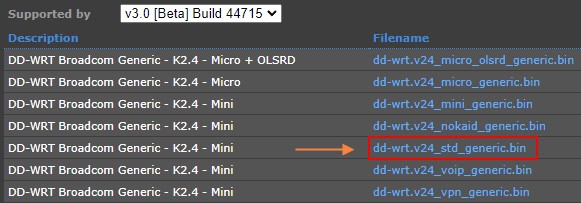
Click on the filename and download it to a USB drive that you can connect to a PC you will be directly connecting to a PC to upgrade the firmware from.
Assign a Static IP Address to Your PC
This step is needed for your PC to communicate with the router. As they get reset to defaults, we need to configure our network adapter in the same network as the router’s default network. To do this, follow these steps:
Step-1: Go to your Windows Control Panel > Network and Internet > Network and Sharing Center and Select “Change adapter settings“
Alternate Shortcut Method: Click on the Windows Start button, Select “Run” type “ncpa.cpl” and click OK. This will display the network adapters for you same as step-1.
Step-2: Right Click on the Ethernet adapter and select “Properties“.
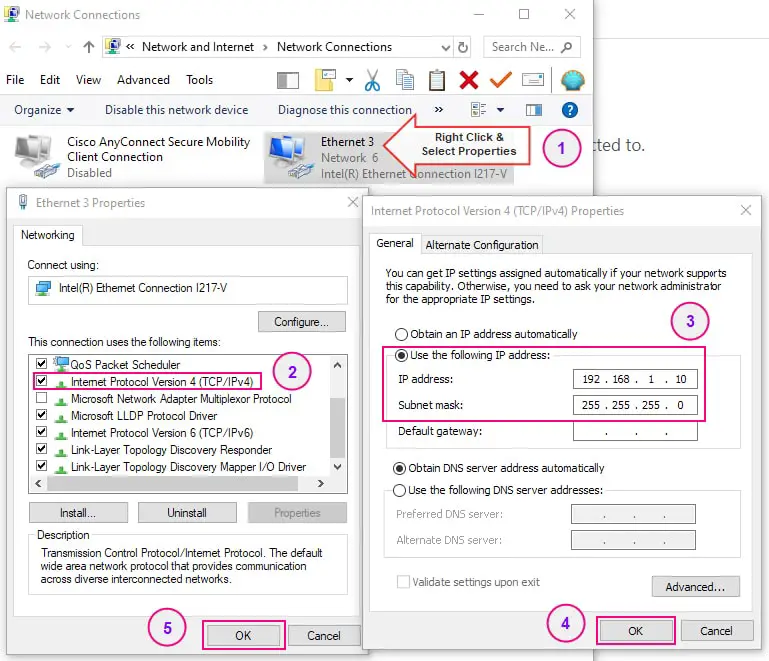
Step-3: Double click on Internet Protocol Version 4 (TCP/IPv4) and select “Use the following IP address” radio button, which will open up the fields of “IP Address”, Subnet Mask, and Default gateway.
Step-4: In the IP address field, type 192.168.1.10. In the “Subnet mask” field type 255.255.255.0. Leave the ‘Default gateway” field blank and Click “OK” and again on the “OK” button.
This makes your network adapter ready to communicate with your Linksys router.
KB Tip: Keep in mind this makes a very important step, as nearly all routers by default are placed into the 192.168.1.X network (Range is from 192.168.1.1 to 192.168.1.254) and the majority of them has a default IP address of 192.168.1.1. So, by assigning our network adapter an IP address of 192.168.1.10, we place it into the same network as that of the router.
Factory Reset Your Linksys Router
In order to flush out any existing configuration on the router, it is important to Factory Reset the router. To do so, we need to follow a 30-30-30 rule.
First power ON the router and let it normally boot. Give it about 5 minutes.
Locate the “Reset button” at the back of the router and press it with a pen, paper clip, or toothpick for 30 seconds, unplug the power for 30 seconds while the reset button is still pushed, and then plug the power back in while keeping the reset button pressed for another 30 seconds and let go.
This makes a total of 90 seconds procedure, that will reset the router back to factory defaults and make it ready for configuration.
Connect Your PC to Linksys Router
Once the router is factory reset, connect one of the LAN ports on the router to your PC Network card with an Ethernet Cable.
To test the connectivity, open up a command prompt window and type “ping 192.168.1.1“. You should get a response back with 4 packets sent and 4 received. This confirms the communication with the router.
Replace Default Firmware with Custom DD-WRT Firmware
Step-1: In your browser type 192.168.1.1 and press the “Enter” key on your keyboard. This will bring a username and password prompt.
Step-2: Leave the username field blank, type in “admin” in the password field, and click OK to access the router’s interface.
Step-3: Click on the “Administration” tab and select “Firmware Upgrade“
Step-4: Click on the “Browse” button and locate the DD-WRT firmware “dd-wrt.v24+std_generic.bin” file you have downloaded earlier.
Step-5: Click on the “Upgrade” button and wait for it to complete.
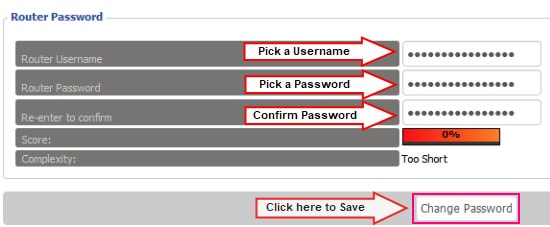
Once completed, the router will present you with the DDWRT UI (User Interface) with the first screen to set up a new username and password (shown in the image). Once that is set up, you’ll gain access to the router management for the rest of the configurations to be made.
You’ll see the interface has upgraded to DD-WRT and has a different look and feel.
Tip: During the upgrade process, try not to interfere in the process to avoid any errors.
Next up, we will configure the basic setup and make it a wireless repeater bridge to connect to the main router.
Complete Basic Setup
After a factory reset, setting up an IP address and username and password is important to do so, as it will secure your router and assign a static IP address to it so it does not conflict with other devices on your network including your main WiFi router.
Step-1: Click on the “Administrator” tab and give your router a “username” and “password” of your choice and click on the “Save” button. Make sure you write it down on paper to have reference to it.
Step-2: Click on the “Setup” tab and under the Network Setup, assign a static IP to the router. In this example, I will use 192.168.1.252. Usually, this IP is towards the end of the network range and likely not used by anything else so works better.
Tip: If you want to make sure an IP is unused, you can perform a ping test by using the command prompt window and typing Ping <ip address>. If you don’t get a response back, it is a good sign that this IP is not in use so you can use of for your Linksys router.

Step-3: You can give your router a name such as in this example ‘Linksys-Bridge“.
Step-4: Set “Local IP Address” to 192.168.1.252.
Step-5: Set “Subnet Mask” to 255.255.255.0
Step-6: Select your Time Zone in the drop-down window and enable “NTP Client“.
Step-7: Click on the “Save” button to save the configurations made so far.
Step-8: Click on the “Apply Settings” button
Note: At this point, you will lose connectivity to the router since we have changed the IP address and those settings got applied now. To regain access to the router, type in 192.168.1.252 in your browser, and use the updated Username and Password you have set up in the earlier step.
Wireless Repeater Bridge Configuration setup
Step-1: Click on the “Wireless” tab and under “Basic Settings” select the following:
- Wireless Mode: Repeater Bridge
- Wireless Network Mode: Mixed
- Wireless Network Name (SSID): Enter the SSID of your main Router here
- Network Configuration: Bridged
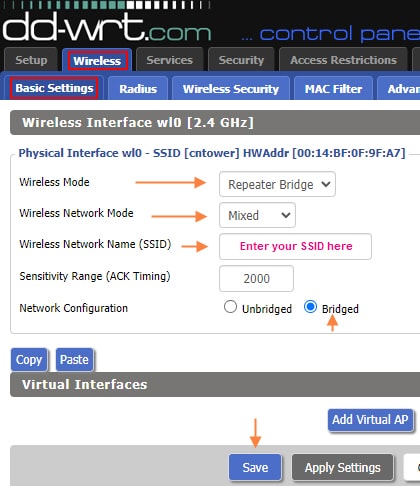
Step-2: Click on the “Save” button.
Step-3: Click on the “Wireless Security” tab and Select the fields that match your main router’s WiFi settings. In this example, I have the following:
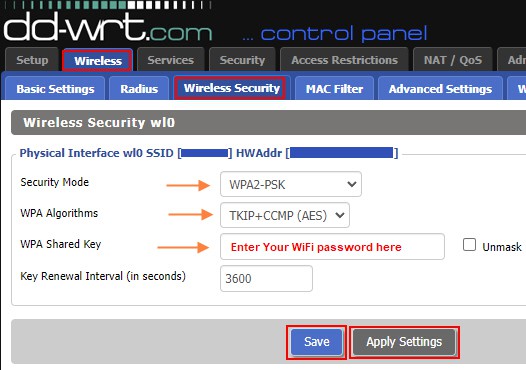
- Security Mode: WPA2-PSK
- WPA Algorithms: TKIP+CCMP (AES)
- WPA Shared Key: <enter your main Router’s WiFi password here>
Note: These settings are important to match with your main Router’s WiFi settings to successfully create a wireless repeater bridge with it.
Step-4: Click on the “Save” button first, and then click on “Apply Settings“
Step-5: Click on the “Status” tab and then click on the “Wireless” tab. At the bottom of the page click on the “Site Survey” button, it will pop open up a list of available WiFi networks. Locate your WiFi SSID in the list and click on the “Join” button next to it to join the bridge with your main router.

This will connect your Linksys router as a wireless repeater bridge to your main router, and give you access to the Internet via wired connections to the Linksys router. Bridge setup completes here.
To access the Internet on the connected device, it needs to obtain an IP address via DHCP request from the main router, so the adapter settings we made as static will need to change to Automatic. Follow the steps below to change it to automatic IP assignment.
Switch Your PC IP Address to Automatic
You can convert the static IP Address of your PC to DHCP so that the IP gets assigned by the main router via your Linksys repeater bridge you are connected to.
Step-1: Go to your Windows Control Panel > Network and Internet > Network and Sharing Center and Select “Change adapter settings“
Alternate Shortcut Method: Click on the Windows Start button, Select “Run” type “ncpa.cpl” and click OK. This will display the network adapters for you same as step-1.
Step-2: Right Click on the Ethernet adapter and select “Properties“.
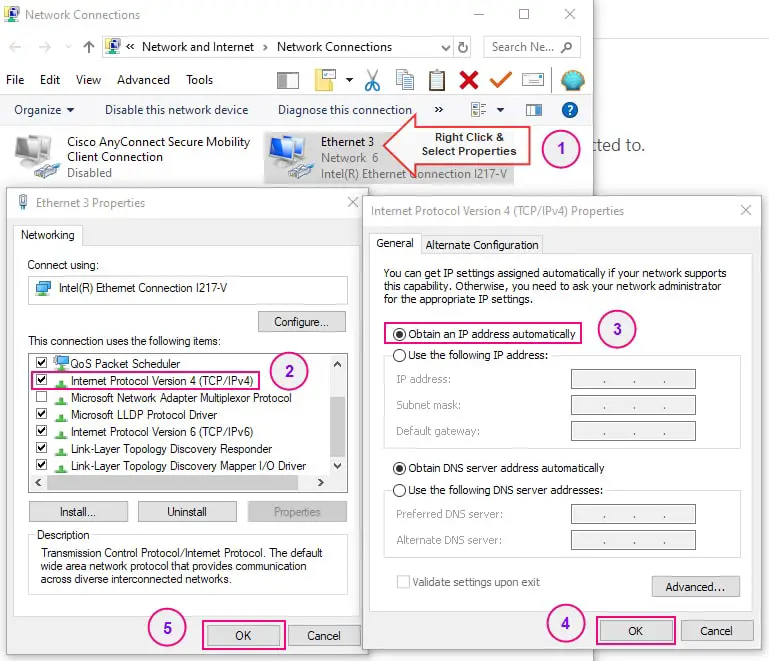
Step-3: Double click on Internet Protocol Version 4 (TCP/IPv4) and select “Obtain the IP address automatically“.
Step-4: Click “OK” and again on the “OK” button.
This will let your PC get an IP address automatically. To verify it, you can open a command prompt by going to Windows Start > Run > type “cmd” and click Enter. Type ‘ipconfig‘ and press Enter. It will display you an IP address in the 192.168.1.X network assigned automatically by your main router.
You can test the internet access by opening a browser window and accessing a website on the Internet.
This completes the Wireless Repeater Bridge configuration of the Linksys router. You can use up to 4 wired devices to connect and have access to the Internet. In case you need a 5th device to leverage the WAN port, you may do so by the method outlined below.
How To Convert a WAN port to a LAN Port
If you would like to connect 5 wired devices to your bridged Linksys router, DDWRT will let you convert the WAN port on the router to a LAN port, making it the 5th port in addition to the already available 4 LAN ports. To do so, follow the steps below:
Step-1: From the “Setup” tab, click on the “Basic Setup” tab.
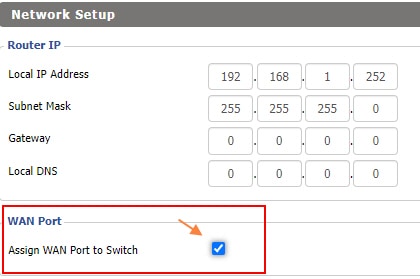
Step-2: Click on the “Assign WAN Port to Switch” to place a Checkmark on it.
Step-3: Click on the “Save” button first and then Click on the “Apply Settings” button to apply settings.
Since we will be bridging the Linksys router wirelessly, therefore the WAN port will not be used, so you may convert it to a LAN port if you need it to connect a 5th wired device to it.
Test and Backup Your Configuration
Make sure you take a backup of the configuration and save it to an external USB drive for later use. To do that, access the “Administration” tab, then select the “Backup” tab and Click on the “Backup” button at the bottom.
It will open a window with a backup file to save to your PC. Select the USB drive and save it. These become handy to quickly restore the configuration instead of going through all the steps explained in this article every single time you may experience an issue. It surely saves a lot of time.
In the future, if you ever experience an issue, you can simply factory reset the router, access it through the default IP address explained in this article, and on the same “Backup” tab, you have an option for Restore Configuration. Click on the “Choose File” and locate the backup file and click “Open” and then click on the “Restore” button to get all configurations back and be up and running in no time.
Fun Fact
Although this method showcases the Linksys WRT-54G router, you can use it for any other router to make it a wireless repeater bridge using DD-WRT firmware. This includes other Linksys router modes as well as other wireless router brands including TP-Link, and D-Link routers. Make sure the model and version is supported on the DD-WRT website.
I hope this article helps you make use of your older wireless router collecting dust to enhance and optimize your home wireless network.