Many of you may not be aware of the USB ports made available on ASUS routers can actually be utilized for creating NAS (Network-Attached-Storage) within your home network.
Having a NAS (Network-Attached-Storage) at your home network is one of the most useful storages that can boost your file-sharing productivity from any wired or wireless device at your home network. ASUS routers have this feature built-In, that provides you with your own private cloud storage.
In this article, we’ll discuss a step-by-step procedure to make NAS using an ASUS router, which is yet, another powerful and very useful feature of this WiFi router.
I have an ASUS RT-AC68R router that has 1x USB 3.0 and 1x USB 2.0. For the purpose of NAS, we’re going to use USB 3.0 for better speeds. However, if you have another ASUS series router such as RT-AC86U, please take a look at for USB ports on it and you can give it a try as described here.
Let’s go over the steps to make it happen.
Step-1: Prepare Windows PC as Samba client to make it enabled for file transfers with NAS. Access “Turn windows features on or off” by using the Windows search feature. Look for “Samba Client” and turn it ON by checking it if it is not already. You may need to restart your PC after setting this feature on. 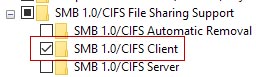
Step-2: Get a USB drive of desired capacity to be used as NAS. Although any type will work ok, it is recommended to get a USB 3.0 for faster speeds since the router offers a matching USB 3.0 port.
Step-3: Format the USB drive with Fat32 or NTFS filesystem to make it ready for storing data
Step-4: Plugin the USB drive into the USB 3.0 port of the Router (available at the back). It is marked as USB 3.0 and also physically should show a Blue strip inside the port to identify it.
Step-5: Click on “USB Applications” from the left menu items at the dashboard
Step-6: Click on “Servers Center”
Step-7: Click on the “Network Place (Samba) Share / Cloud Disk” tab at the top
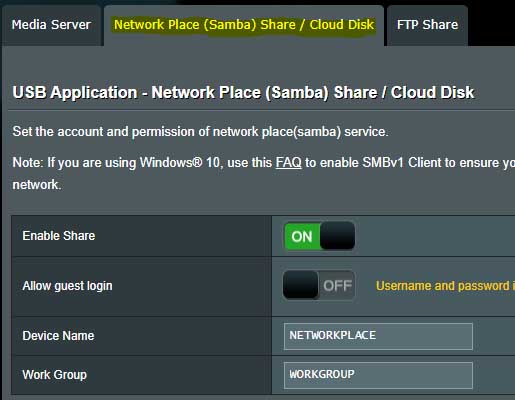
Step-8: Make “Enable Share” ON
Step-10: Give a name to the storage device
Step-11: Fill out the Work Group name used by your network. If you don’t know what it is, you can easily find this out on Windows PC by clicking the START button, go to Control Panel > System and Security > System to display the workgroup name.
Tip: If you like shortcuts, you can access the same window by holding the “Windows” key + “Pause/Break” key for it to pop up.
- Click on “Apply” to set it up.
This completes setting up your NAS ready for file storage and accessible from different devices on your home network wirelessly.
Some of the features ASUS Router will offer for Disk Management are:
- “Health Scanner” – You can access it by clicking on the “USB 3.0” icon on the dashboard.
- The USB 3.0 icon will show a nice progress bar indicator to show you how full is your Storage running.
- You can also Format the drive by clicking the “Format” tab at the top. This helps to format the drive without unplugging and plugging it back. It comes in handy in case you’d like to have larger storage connected to your PC that you’d like to keep offline for permanent storage to offload your NAS drive to it. Hence avoids the hassle of physically disconnecting the USB drive and remounting it back again.
How To Access SMB / NAS Storage Wirelessly on your Home Network?
With your NAS setup on ASUS Router, you can easily access the storage wirelessly from various devices including Windows PC, an IOS device (running IOS 13 and up), and an Android Device. We’ll discuss the configuration steps for each of these devices in detail below.
How To Access SMB NAS Storage on Windows PC?
Step-1: Click on Windows/Start button.
Step-2: Click on “This PC”.
Step-3: At the top menu, select “Map Network Drive”. 
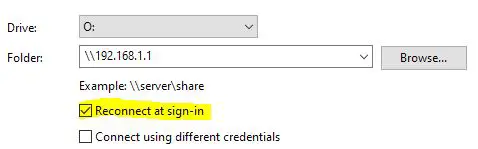
Step-4: Select the Drive letter of your choice to assign it to the NAS.
Step-5: In the Folder section, type \\192.168.1.1\ and click Browse. Note: This is your Router’s IP address, in case you’re using a different one, just type that one in here instead.
Step-6: Select the Main folder for the entire storage access, or a subfolder of your choice.
Step-7: Make sure to check the option “Reconnect at sign-in” to keep the assignment intact.
Step-8: Click “Finish”.
You’ll see storage is now added with the drive letter assigned. You can now easily transfer files between your PC and the NAS attached to your ASUS Router.
How To Access SMB NAS Storage on Android Device?
Let’s face it, we all get tired of running out of space on our Mobile devices with ongoing picture and video taking. Using this solution, you can quickly offload your Pictures and Video files to the NAS without wiring your device to the PC for file transfers. Now all of that can be done with a few taps and done.
Step-1: Make sure you have an updated version of the File Manager app “My Files” from Samsung
Step-2: Open the “My Files” app on your Android Device.
Step-3: Tap on the 3-dotted icon at the top right and select “Settings”
Step-4: Tap on “Customize My Files home”
Step-5: Turn ON the “Network Storage” and go back to the main level. You’ll notice “Network Storage” icon now appears
Step-6: Tap on “Network Storage” and select “Add network storage”, and then select “Network drive (SMB)”. This will start locating the recently configured NAS with the name you’ve assigned earlier. You can select it.
Step-7: Use the username and password of your ASUS router and click “Add”
Now you’ll have your NAS storage available on an Android device and can transfer files to and from your device very easily.
This helps tremendously by speeding up your workflow as well as offering a backup device available at all times to preserve your important data.
How To Access SMB NAS Storage on IOS Device?
You can easily offload your heavy picture and video files to NAS with a few taps and keep your device’s internal storage available to you for videos and pictures when you need it the most.
Please note: For an IOS device to access SMB storage, it needs to be at least IOS 13 and up.
Step-1: Let’s go through the steps to configure it:
Step-2: Open the Files app on your IOS device (iPhone or iPad)
Step-3: Tap on the “Browse” button at the bottom of your phone or on the sidebar of your iPad device
Step-4: (Optional) Tap on the 3 dots “…” more icon and access More for further options if available
Step-5: Select the “Connect to Server” option
Step-6: In the server section type: SMB://192.168.1.1 and click “Connect”. Note: This is your Router’s IP address, in case you’re using a different one, just type that one in here instead of 192.168.1.1.
Step-7: Type in the Admin Username and Password of your ASUS router and tap “Next”
Now you’ll see under the Shared section this server will show up to be accessed
Final Thoughts
Now you can have a home-built NAS easily accessible from all 3 types (Windows, IOS, Android) devices.
With a wide variety of cost-effective external USB drives options available, you can enhance the storage capacity according to your needs and enjoy using this awesome feature without having to dedicate a PC for this service, since your Router is running at all times with NAS being available to you at all times.