Quality of Service (QoS) is a useful feature offered by ASUS in their home line wireless routers that helps manage the bandwidth consumption of applications running in parallel on the network and keep them optimized for their performance.
Do You Need to Set Up QoS on ASUS Router?
Yes, You should use QoS on your ASUS router, if you have limited bandwidth available. A properly configured Quality of Service on the router ensures smooth performance of applications without affecting each other. With bandwidth-demanding modern gaming, it is more of a necessity than an option.

In this article, I will explain the concept of Quality of Service in detail for understanding, and discuss various settings you can use to benefit from this feature on your ASUS router, so stay tuned!
Table of Contents
What is QoS – Quality of Service?
Quality of Service (QoS) is a network tool that monitors the traffic flows and lets you manage and prioritize them according to your needs. It becomes more important when your overall bandwidth capacity is limited, while you have multiple time-critical applications you would like to run smoothly on your network.
With proper QoS implemented, you can ensure that all applications run smoothly in parallel without any one of them getting compromised due to other applications stepping over it.
For an analogy and understanding, think of it as a toll plaza on a Highway, where you come to a stop scan/pay a toll and off you go. When you approach such a toll plaza, there are several terminals you can get to but you always get to the one that has fewer cars lined up by your judgment to avoid unnecessary delays.

Similarly, QoS on a network acts like a toll plaza that monitors the traffic flows and allows traffic based on bandwidth availability at any given time according to how you have configured it.
It also has mechanisms to limit traffic for a particular application to a max capacity, which means it cannot exceed that limit regardless of more bandwidth is available, it is called bandwidth limiting which I will discuss in a bit more detail.
In this article, I will be using ASUS RT-AC68R / RT-AC68U router for showcasing examples, although other models also have similar configuration items available.

How To Monitor Traffic Flow on ASUS Router?
ASUS Router offers a UI for Bandwidth Monitoring and lets you enable or disable this feature.
Bandwidth monitoring should be performed first, before configuring QoS, to get a sense of your data consumption and identify your most and least bandwidth-consuming devices.
To turn this feature ON, click on the “Adaptive QoS” link on the side panel, and, on the “Bandwidth Monitor” tab, switch the Apps analysis toggle button to the “ON” position and click on the “Apply” button at the bottom of the page to keep it enabled.
The dashboard is quite intuitive that shows a real-time view of the overall upload and download bandwidth consumption. In addition, it also provides you with the breakdown of the bandwidth consumption on a per-device basis including your wired and wireless devices.
You can sort them by various factors for better visibility and understanding.
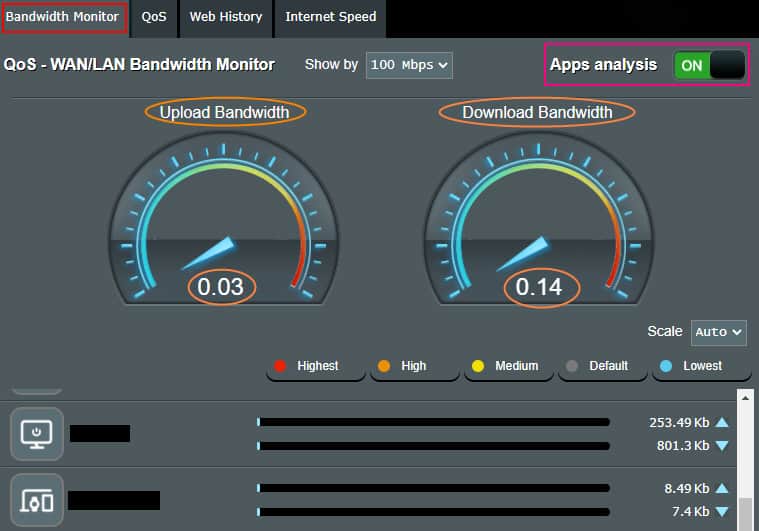
This will give you a realistic view of your devices and their bandwidth consumption, after which you can better decide how much bandwidth can be allocated to a particular device on your network.
Of course, a balance needs to be struck so that the application(s) running on the device are not suffered yet limited by appropriate proportion.
How To Set Up QoS on ASUS Router?
ASUS Router offers a section called “Adaptive QoS” that is dedicated to setting up QoS according to your requirements. There are three ways you can set up QoS based on your needs. Let’s discuss each in detail.
Adaptive QoS
Adaptive QoS offers you a variety of standard configurations tailored for specific needs. They include:
- Games
- Media Streaming
- Web Surfing
- Learn-From-Home
- Work-From-Home
- Customize
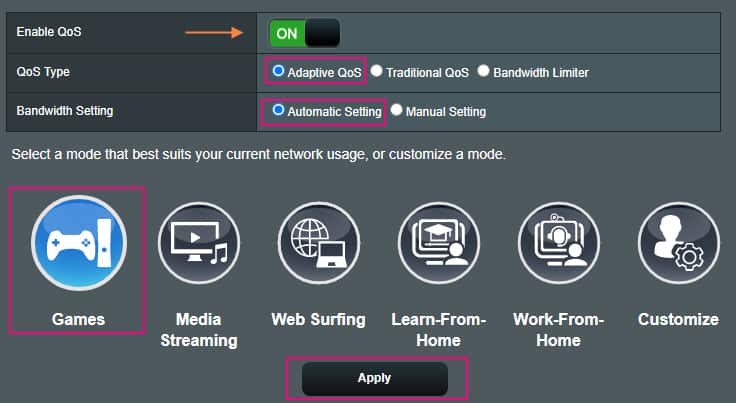
You can either set up one of the standard ones like “Games” OR select “Customize” which further gives you an option through a drag-n-drop method to set the priority of a particular application in an ordered list. The application at the top of the list would be at the highest priority, while subsequent ones will decrease in priority to the one at the bottom is the lowest priority.

With these settings, the router monitors the traffic type and manages it according to the available bandwidth, and makes the best decision to keep everything optimized.
Traditional QoS
Traditional QoS is more for advanced users, who know specific details of the applications and port numbers to set them up for prioritizing.
In this option, you first set up the total Upload and Download bandwidth you get from your ISP (Internet Service Provider), so the router knows exactly how much bandwidth it has on its hands to stay within. Once you set that up, click on the “Apply” button which will open further options for configuration.
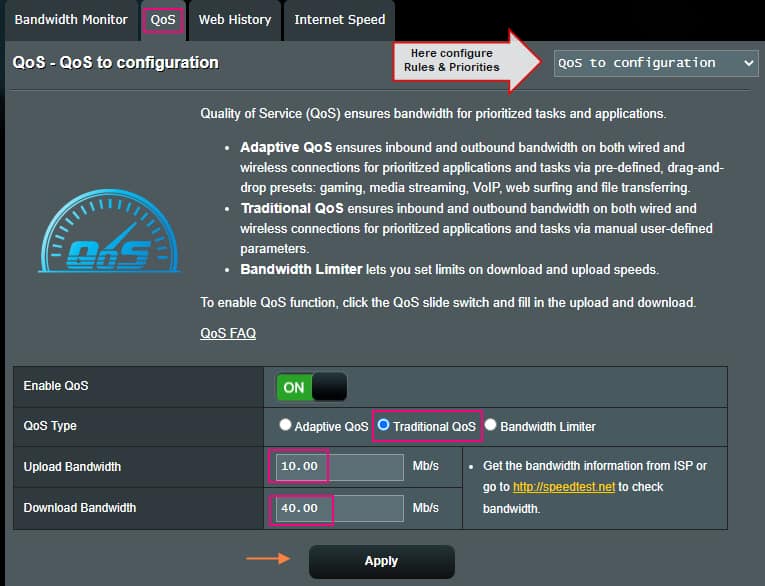
After the total bandwidth is applied, you will notice at the top right corner a configuration drop-down menu. Here you can set up:
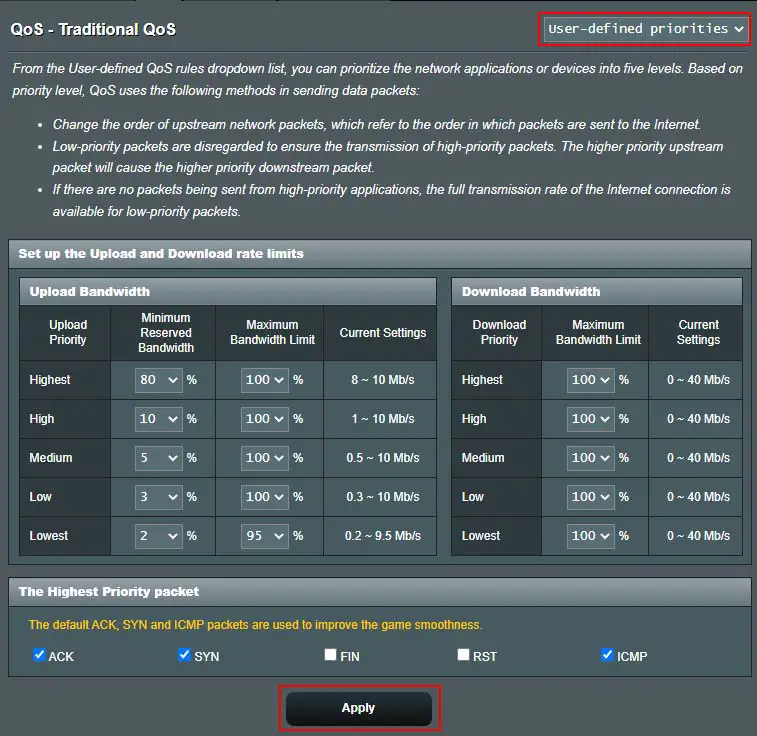
- User-defined Priorities.
- User-defined QoS Rules
The Priorities section lets you set up the minimum and maximum bandwidth limit for Upload and Download. These are then used in the rules you can set explained next.
In the Rules, you can set up a Service name, Port number, Protocol, Traffic rate, and Priority. For example, HTTPS, 443, TCP, 0~512 Kb, Highest.
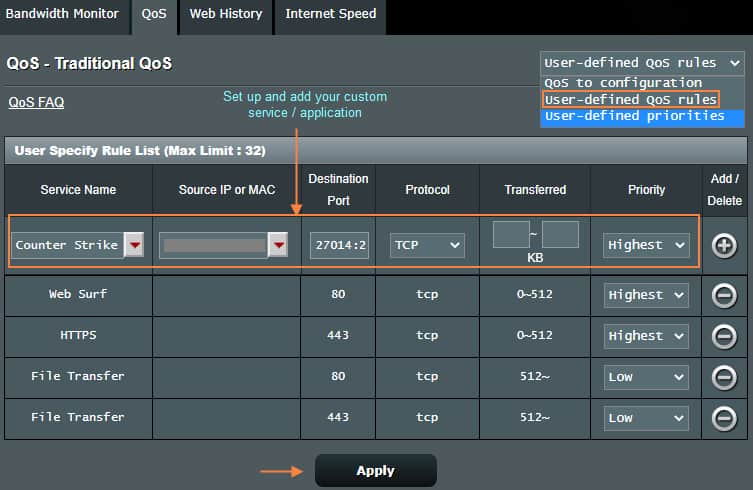
As I mentioned, these settings are quite granular and while it offers more control to the user, you have to know and calculate everything before you can add them into the Priorities and Rules to benefit from this feature.
Keep in mind, misconfiguration or skipping something that is of importance for your applications may impact negatively on the performance than improving, so thorough homework is needed to see great results.
Nonetheless, I really appreciate ASUS offering this much granular control for the tech-savvy user to configure and tailor their QoS according to their needs.
Bandwidth Limiter
If you are familiar with QoS concepts, it is equivalent to “Policing” in Cisco terms, and even if you don’t, from the name you can pretty much tell you get a ticket for over-speeding. Similarly, bandwidth limiter works in the same manner.
You can select a device on your network from the drop-down list of devices and click on the, and assign it a specific download and upload bandwidth in Mb/s. Once you are done with your selection, click on the “Apply” button to apply the settings.
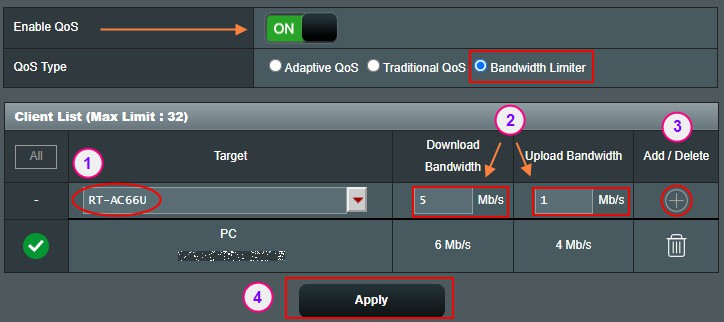
If the device happens to be a PC, you can test the bandwidth by running a speed test from it using a browser and notice it is limiting it to the bandwidth you have assigned to it.
ASUS Router in Bridge Mode (Explained)You may have noticed the target device in my example is RT-AC66U, which is an ASUS router that I am using in Media Bridge Mode, and can also set up bandwidth limit for.
This comes in very handy to limit a PC or another device that is consuming a lot of bandwidth either gaming online or streaming videos which has the potential of choking your other devices on the network to perform poorly. Adding a bandwidth cap on a device ensures it stays at that level at its maximum consumption capacity.
Why Do You Need QoS on ASUS Router?
If you have a larger pipe, for example, 1 Gbps Internet capacity, QoS may not be of that much importance because there is plenty of bandwidth available for devices to consume without causing an issue.
However, if your Internet capacity is around 50 Mbps download and 10 Mbps Upload with multiple devices running on your home network, then having a proper QoS implemented becomes necessary.
Is Auto QoS better Than Manually Set Up QoS?
It all boils down to your needs. Some networks can be more complex than others. The more devices you have on your network and the lesser total bandwidth you have available to confine to, QoS tailoring would be as much important.
However, ASUS routers give you all the tools you need (as discussed in this article) to configure your QoS to best suit your needs.
If you want the router to make all the decisions then I would recommend you go with the set templates in Adaptive QoS. However, if you have all the details and want to configure everything more granularly, then you can go the “Traditional QoS” route to add the specifics.
As for me, My total bandwidth is under 50 Mbps, which is not much, to begin with, so I need to rely on QoS heavily. For my needs, I found the Bandwidth limiter feature works like a charm, as I can limit the devices that have the potential to choke my network and give them enough bandwidth with extra buffer to run smooth. That way all other devices get the bandwidth they need to perform properly.
How to Optimize Gaming with QoS?
First, find out the bandwidth requirement of the games being played on PC or Console, and focus on the one that has the highest requirements of all. If you meet those, then other ones will perform just fine as well. You have a few ways to do that. Let’s discuss those.
Option-1: Once you have the bandwidth requirement sorted out, you can use the bandwidth limiter feature to add those in for your gaming device.
As a rule of thumb, keeping 50% bandwidth for the rest of the devices on your network, you can allocate the limit for your gaming device a bit higher than the required bandwidth to allow room for throttling and keeping the gaming experience smooth without any jitters and lags.
Option-2: Access the “Game” section of the ASUS router, where you can add your gaming device that the router will prioritize over other traffic.
Keep in mind that this option disables the QoS setup you may have done, meaning it will be overridden, so use this option with caution.
Option-3: Use “Adaptive QoS” automatic settings with “Games” being enabled for prioritizing the traffic. I would go with “automatic” settings and let the router make the best decision to manage the traffic against available bandwidth.
Option-4: This one is more advanced and can be set up using the “Traditional QoS” feature with Rules and Priorities configuration, where you would need to identify the traffic source, destination IP addresses, and associated ports to set them with the “Highest” priority.
How To Prioritize Voice Traffic On Network?
If your network is suffering from congestion, you may experience choppy or garbled voice on your VoIP calls. This is because Voice packets are time-sensitive and cannot afford to experience delays, unlike data packets.
A delayed voice packet is a lost packet in terms of effectiveness since it cannot make it back into the conversation that has already happened. Instead, it adds choppiness and garble into the mix. It can be solved by prioritizing voice packets over other applications to pass through at priority.
To understand this concept, think of it as an HOV lane that remains fairly open for cars to drive in a better flow, while other lanes remain in a halt situation due to congestion. Although, only qualified cars can get on the HOV (priority) lane.
You have two options to prioritize Voice/VoIP traffic on your network. First, you can bandwidth-limit the devices that have the potential to use high bandwidth to keep them limited to a reasonable allocation. This will allow enough room for Voice traffic not to be stepped over.
Secondly, you can enable Traditional QoS with VoIP priority, which automatically detects voice packets and prioritize them over other types of traffic to allow smooth conversation without delayed and lost packets. To identify whether your
What Happens if You Exceed Your Bandwidth Limit?
With a bandwidth limiter in place, you will not be able to exceed that limit because the router will enforce that policy to keep your traffic limited to your allotted bandwidth limit.
If your device is not bandwidth limited, it can go up to the full allotted bandwidth capacity of your Internet assigned by your Internet Service Provider. In that case, if you are running on full throttle occupying most of the available bandwidth, other applications on your network will suffer from performance issues simply because there is just not enough bandwidth available for them to function properly.
That’s why for the device on your network that has the potential of consuming a lot of bandwidth, it is best to keep it bandwidth-limited using the bandwidth limiter function on your ASUS router.
Do You Need to Reboot after Setting up QoS?
No, you do not need to reboot your ASUS router after setting up QoS and applying it. It takes a few seconds to apply the new settings you configure, to take an effect and be active. In some odd cases, if the setting does not get applied, you can refresh the page, log back in and try to set them up, and apply again.
Can QoS Crash Your Application?
A misconfigured QoS has the potential to limit your PC beyond normal use, however, it will not crash your application. Application crashing must be investigated and troubleshot separately than mixing it with QoS configuration.
How Much Bandwidth Is Needed for Valorant?
Valorant is one of the popular games mostly played these days. In my personal experience, a 6 Mbps download and 4 Mbps upload is sufficient for smoother gameplay of Velorant. It is also best to use a wired connection for more stability and avoid glitches during gameplay. Otherwise, for a wireless connection, you should use a 5 GHz band and be in closer proximity to the router.
For a QoS setup on ASUS router for Valorant, you can use these speeds on a Bandwidth Limiter to keep your entire network performance in good shape, especially when your total Internet speed is around 50 Mbps.
How Much Bandwidth is Needed for Rocket League?
Rocket League is another popular game that is server-based, so your bandwidth and prioritization can help improve the performance. Typically you can go with 6 Mbps download and 4 Mbps upload for a smooth performance without jitters and lags. I have tested it with these settings and the results are just fine.
Another factor to improve is to go with a wired connection and for wireless, you can use the 5 GHz band to allow higher speeds. Although 2.4GHz should also be fine as long as you are not too far from the router with lots of obstacles in between.
Final Thoughts
ASUS has done a tremendous job by embedding QoS features in their home line wireless routers, as it wasn’t something offered by many brands for some time and QoS application was more restricted to commercial-grade routers such as the ones from Cisco, setting up of which was not easy.
Now, with everything available to you in a nice GUI and a good range of options being made available, it is quite easy to set up QoS and optimize your home network based on your needs in a short time.
I hope you enjoyed and found this article helpful.


